A New Demoreel & My Cartoony Face Rig Structure
Posted on September 09, 2013 - category: character-rigging
I just got back from an awesome summer vacation, travelling in South America! Now I’m back to work, developing some new Python animation tools and plugins (which I’ll blog about soon) and looking for new clients and projects for the coming year! Today I want to show you my new character rigging demoreel. It has a few highlights of my tech artist work from this past year. After the video, you’ll read a bit about the facial rig that I developed with help from Rigging Dojo for a cartoon feature film.
In this demoreel:
- Character rigging for Ember Lab’s successfully Kickstarter-funded indie film, Dust
- Cartoony face rigging for an animated feature film
- Cinematics from a Coca-Cola mobile game I worked on (I also did some in-game rigs for a Maya/Unity workflow.)
- Some rigging goodies like the cylindrical foot-roll I blogged about, and an auto-swinging trunk/tail rig.
- Some footage from some mobile game prototypes I’m developing in Corona and Unity3D.
The “Face Plates” Rig
The cartoony face rig I developed was really interesting. I based it off of some of the principles from “A Hybrid Approach to Facial Rigging“. And I took a session of Rigging Dojo where Brad Clark and the Dojo community really helped me push the quality of the rig.
The face rig needed to be flexible and expressive, but it also needed to be fast to setup and swap between characters. There was a large cast of characters, and I started the project alone. Eventually we hired a second rigger, but the process had to be modular and stream-lined. In the past, my face rigs would have used dozens of blendshapes, based on Stop Staring. But in this production we had a LOT of modelling revisions, client feedback and a small team!
The process had to be simple and fast.
So we had to have a solution that didn’t have a lot of brute-force work for each character, such as requiring too many corrective blendshapes which would have to be re-done or tweaked with each modelling revision. I kept the amount of blendshapes down to only 8-10 per character, for special things like puckering and “ewww” shapes. My solution was something I called “Face Plates”. Using a series of nurbs surfaces which are shaped to match the curvature of the character’s face.
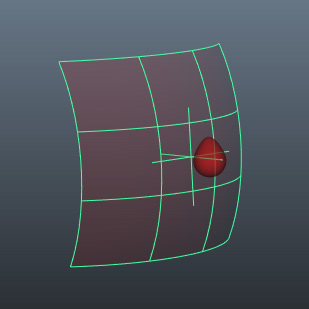
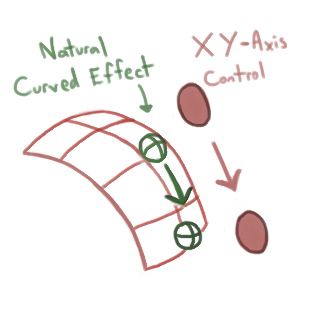
The curvature of the plate is controlled by two blendshapes. By combining the two shapes, they can be concave, convex or saddle-shaped. Using follicles and geometry-based constraints, a joint follows the curvature of the nurbs, giving an effect of sliding over a rounded structure.
The animator uses the controller in X and Y, and you get a nice natural curved effect with less effort. Using the controller in Z lets you pull the skin off of the surface if you need to.
The advantages I found with this system…
You could also use a single object like in the “Hybrid Approach to Facial Rigging”. But by having separate pieces, you have a few advantages:
- Place them to match the face in a fairly complex way very quickly with only a few parameters and without having to do any modelling.
- Constrain the plates to the rig controllers or add Driven Keys for an additional layer of complexity/expression.
- Have 1 controller moving concave while a nearby one moves convex for creating overlapping or fat-bulging effects with only standard skinning.
- Easily make or remove plates to create a custom character. In this way we were able to use the same basic rig to also rig cartoony animals with completely different proportions.
- The size of the plates gives your joints a natural limit, preventing the animators from breaking model.
A Simple Skin-Based Method for Fast Setup
But the best thing about this approach is the simplicity of the skinning. By using joints to skin the face, when the clients asked for modelling revisions, it was simply a matter of adjusting the positions of the Face Plates, and then transferring the weights to the new geometry without too much pain and re-modelling of blendshapes. This also made it fast and easy to setup new characters. Animation could even be swapped between characters, though it would take some tweaking afterwards. (In the future I’d like to figure out how to re-target the animation. The translation, scale and curvature of the plates holds information about the characters proportions.)
I then set up a face panel which controls large expressive motions on the face for quickly blocking out poses. And then the controllers on the face allow the animators to make more fine-tuned adjustments. Again, 90% of the face rig is done through placing the Face Plates and using regular skinning. Other than that, the head squash-and-stretch uses a lattice.
Do you have any questions or feedback? Do you have any favourite examples of face rigging systems? Share them in the comments.
Comments (closed)
Chris Lesage: Great link, thanks Jamie! I had the .mp3 of this talk from GDC, but this is much better.
Jason Campbell: This looks like a really strong and flexible system. Are the plate blendshapes used to speed up the initial setup in matching the model curvature or are they driven by the controllers in posing to modify the underlying geometry? Dare I hope for a full tutorial sometime in the future? Thanks, J.
Chris Lesage: Hi Jason, They are just to speed up the setup. I connect the blendshapes via 2 parameters in the channel box of the nurbs surface, so I can quickly translate and curve it without fussing with the blendshape node. Our characters were nice and round, so these 2 shapes were good enough to match the geometry. Using the curvature to drive the geometry is an interesting idea though! I’d be happy to write about this more in depth later on. There are some other tricks I didn’t mention, like using 2 joints for each controller, one that doesn’t follow the Z-translation of the controller. So for example you can have a nice round shaped cheek bulge when you pull in Z on one joint, but include a wider, softer influence on the other joint which could give you nice soft motion up near the eyes when moving the cheek in X and Y. (That might not make any sense without a picture or a video! )
Debster: You are awesome. <3
Jamie: Cool bro! good to see someone else also using nurbs surfaces for sliding joints.. I’ve been using this trick for a few years for face rigs.. I like to call it High Fidelity Facial Rigging.. I just place all the surfaces I want and run a script to setup everything.. but I got the idea originally from David Hunt from Bungie.. in a publication ‘Modular Procedural Rigging’ on their website.. http://halo.bungie.net/inside/publications.aspx check it out.. some really cool stuff in there.. Good work mate! Jamie
Marley Kudiabor: Hello Chris, I recently have been doing nothing but this setup and wanted to know if you are still using it at all or if you have transitioned into any other interesting setups. I have used this setup almost exclusively and it works great especially for closing large almond shaped almost “anime” style eyes if you use spheres and love it, I also used it for a realistic character and it worked out great there as well. I just wanted to know if you had any other setups to share. Many thanks
Chris Lesage: Hey Marley. I’m working mostly on props and Python tools this year, so I’ve only done a few faces. Glad you enjoy the setup. Cheers!
sufiyan: Hi Chris, I’m seeking tips and tricks on particular scene in which I’m rigging a bear who is literary going to strip off his upper fur skin like any jacket or coat. So bit concerned about how to approach it. Please do you have any suggestions or idea for this. Let me know… Thanking you…
Chris Lesage: haha, gross! When you are trying to solve complex deformations like this, sometimes it helps to consider it in layers. So for example, could you make a version of the face that is flattened out in 2D, and then create a peeling effect on that flat face? THEN, you could create a blend shape or a deformer that wraps the flat face onto the 3D shape of the face. That might not work specifically. But the main idea is to think of it in layers if you can. Put the most complex deformation on the most simple geometry that you can define, and then deform the simple geometry into a more complex shape. Does that give you any ideas? I’d love to see what you come up with.
sufiyan: Hi again, I appreciate your suggestion and tips. The idea of flattened faces is seeming to be little workable in which I might wrap simplified mesh with original mesh but in my scene he is going to roll the cloth after striping off as well as I was planning to use proxy rig set up within same bear rig for upper furry skin or else could make separate version of rig for furry skin and combine it scene…but both method will gonna hectic and challenging, however thank you for your feed back…
sufiyan: One more thing how it would be if I use sticky lips kind deformer for opening part of furry skin…will it be fine for this…