In this blog post I want to show you a cool trick for making semi-graphical Status labels in the writing program Scrivener, and then explain some of the reasons you might want to do this. I used it to make a manual progress bar.

I use Scrivener and Markdown to write my blog, as well as writing documentation and training material. If you don’t know, It is a structured writing program - usually used for novels, scripts, screenplays and academic writing - which can output to PDF, HTML, Markdown, LaTeX, ebook, Final Draft, Word formats and more.
So it is also a great tool for blogging, research, course notes or technical documentation for software.
I’m currently transitioning the help docs for a Maya plugin I’m working on from Google Docs into Scrivener. The revisions/snapshots and structured nature of Scrivener make it ideal for documents which need frequent updates.
Scrivener already has a progress bar which is based on target word-count. That’s fine if you are aiming for a particular length in a long novel or an essay with a word target. However, you don’t always know what your target is before-hand. Especially when you are writing a lot of shorter documents such a blog posts, course notes, technical documentation or training tutorials.
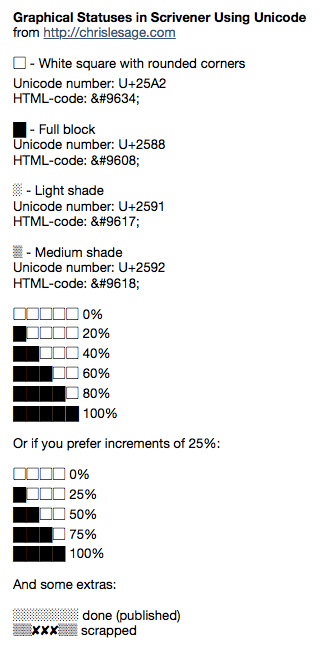
I prefer having manual control. So to simulate a percentage progress bar in Scrivener I created 6 “Status:” options using the following Unicode characters:
Note: If you are setting this up, you don’t have to enter the number codes. Just copy/paste the characters in “Project -> “Meta-Data Settings” and then click on the “Status” tab. You can paste the character there to make these statuses. The numbers are there only for reference in case they aren’t displaying properly in your browser.
▢ - White square with rounded corners
Unicode number: U+25A2

█ - Full block
Unicode number: U+2588

░ - Light shade
Unicode number: U+2591

▒ - Medium shade
Unicode number: U+2592

▢▢▢▢▢ 0%
█▢▢▢▢ 20%
██▢▢▢ 40%
███▢▢ 60%
████▢ 80%
█████ 100%
Or if you prefer increments of 25%:
▢▢▢▢ 0%
█▢▢▢ 25%
██▢▢ 50%
███▢ 75%
████ 100%
And some extras:
░░░░░░░ done (published)
▒▒✘✘✘▒▒ scrapped
Click here to see the image if your browser isn’t displaying the unicode characters properly.
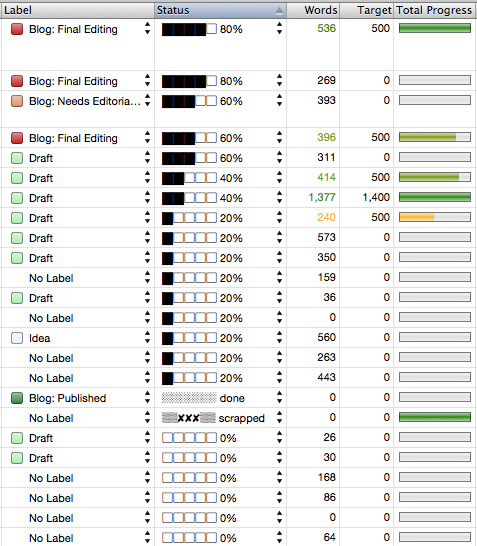
Here’s how this looks in Outline mode:
So Why Do This?
Sometimes your progress depends on elements that are not related to the word-count, such as data, graphs, multimedia elements that another designer is creating, or any other amount of tasks that may need doing.
There is also a big difference between “finished writing”, “finished editing” and “ready to publish”.
Also, you may have a lot of words or notes that need a LOT of editing. Your rough notes shouldn’t necessarily count towards your progress. Maybe you will write 5000 words just to edit it down to 2500. Some days you will end up with less words, but you are still technically making forward progress.
So using “Status” graphically is a way to manually set your progress, in a sort of eye-catching way.
You can also sort by status with this. The black bars go in the correct order, and the “done” and “scrapped” shaded bars go to the bottom, but above 0%.
If you want to search for other unicode characters that you can use, check out this unicode website. You can also copy/paste a character into this website to find out the unicode value.
I bet you can think of some other ideas to make some graphical reminders or just make your status labels more meaningful to you. Give it a try and let me know what you think in the comments.
Comments (closed)
Chris Lesage: Hey everyone. I got a few comments asking to be more specific about how to set this up. Here are some more detailed steps if you want to set this up in Scrivener. Note: All you have to do is copy and paste the unicode characters directly. You don’t have to enter the number code anywhere.
- Copy (Ctrl-C) the squares from my post or from unicode-table.com
- In the Scrivener menubar go to “Project” -> “Meta-Data Settings” and then click on the “Status” tab. This is where you can add your own custom Labels and Statuses or arbitrary meta-data.
- Hit the “+” button to add a new Status and paste (Ctrl-V) the special characters right there. The unicode numbers were just there for reference in case the graphics weren’t showing up properly on anybody’s computer.
Chloe Carson: Hey this is fantastic, thanks so much! I imagine I could use these on Squarespace as well.
ady coles: Hi Chris, This is great! If you don’t mind, i would like to include a link to this article from my ‘scrivener resources’ page. (http://acol.es/stScrivener) Ady
Chris Lesage: Hi Ady, yes please feel free. Thanks for the comment.