Manually Create a Single Maya Follicle in Python
Posted on February 22, 2013 - category: character-rigging
This article is out of date.
It still works. But for a more up-to-date tutorial, try Matrix pinning nodes to surfaces.
Also, from Maya 2020 upwards, there are new uvPin and proximityPin nodes.
Do you use Maya follicles to pin objects to your geometry? Are you still doing it the old way, by creating a Hair System and then deleting all the parts you don’t need? Below I’ll share my simple Maya Python script that creates and pins a single follicle onto a nurbs surface. (Jump straight to the script.)
I love using follicles. They adhere to a nurbs or poly surface and they maintain a good, predictable orientation in normal and tangent space, which means they don’t shift or rotate and they don’t need additional up-vector constraints. It is a great and predictable way to pin things to your geometry.
How you can use follicles:
- Create a flip-free “Ribbon IK” for spines, tentacles or cartoon limbs without needing a ton of up-vector constraints!
- Attach a boat to a flowing water surface
- Rivet buttons or patches onto clothing
- Rivet some controllers to one layer of your character, so you can adjust a second layer. (Imagine a character with a scarf around their neck.)
- Slide facial controls along an underlying “skull” object or create other skin sliding effects.
- Measure the distance between two points (even if there is no vertex where you want to measure) on geometry, even if is being deformed in many different ways.
- Arvid Schneider’s video shows us how we can use follicles as a great way to pin things to different types of meshes http://lesterbanks.com/2012/08/using-maya-hair-follicles-for-parenting-constraining-geometry-to-a-surface/
In the past, I would create the follicles by creating a hair system and then delete everything except the follicles. When I went to script this, I found it was difficult to access the hair system with Python and PyMEL. So instead I wrote this PyMEL snippet which lets you create a single follicle manually. It sets up all the same connections but the hair system never gets created. (I am only supporting nurbs surfaces in this script, because if you use polygons, you need to have UVs on the mesh, and the follicle will act unpredictably depending on how clean your UVs are.)
Setting Things Up
Before we get to the script, I just want to point out how I use this. I never pin follicles directly on to my polygon characters. Why?
- Because if your geometry changes, you have to disconnect and then reconnect everything
- If the UVs get changed, the position of the follicle will change. If your UVs aren’t clean, predicting where the follicle will travel is nearly impossible.
- By using nurbs, you have a nice clean 0 to 1 UV space, which is nice and easy for setting up Driven Keys or distributing multiple follicles in an even row. (Plus you know that 0.5 is precisely the middle.)
So what I do instead is this:
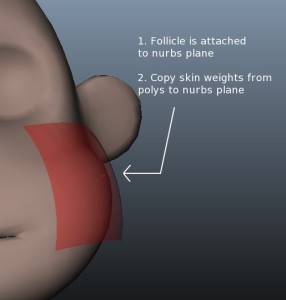
- create a small nurbs plane, big enough that will cover the area I want to work with.
- give it 2-6 patches, depending on how much it will have to deform. (2 often works.)
- Bend it and place it so it roughly matches the shape of your character’s geometry.
- Skin it with the same joints as your character and copy weights. (If you have any other deformers or blendshapes, you will need to match those too.) This way you can safely and easily change your character’s geometry without losing all your follicle work. (This is a common occurrence in production. Never assume your geometry is final.)
Here is the script
import pymel.core as pm

def create_follicle(oNurbs, uPos=0.0, vPos=0.0):
    # manually place and connect a follicle onto a nurbs surface.
    if oNurbs.type() == 'transform':
        oNurbs = oNurbs.getShape()
    elif oNurbs.type() == 'nurbsSurface':
        pass
    else:
        'Warning: Input must be a nurbs surface.'
        return False

    # create a name with frame padding
    pName = '_'.join((oNurbs.name(),'follicle','#'.zfill(2)))

    oFoll = pm.createNode('follicle', name=pName)
    oNurbs.local.connect(oFoll.inputSurface)
    # if using a polygon mesh, use this line instead.
    # (The polygons will need to have UVs in order to work.)
    #oMesh.outMesh.connect(oFoll.inMesh)

    oNurbs.worldMatrix[0].connect(oFoll.inputWorldMatrix)
    oFoll.outRotate.connect(oFoll.getParent().rotate)
    oFoll.outTranslate.connect(oFoll.getParent().translate)
    oFoll.parameterU.set(uPos)
    oFoll.parameterV.set(vPos)
    oFoll.getParent().t.lock()
    oFoll.getParent().r.lock()

    return oFoll
Important: To use the script, select a nurbs surface in Maya and run this line. Set the U and V parameters as you wish:
oFoll = create_follicle(pm.selected()[0], 0.5, 0.5)
If you want to create a bunch of follicles evenly spread along a long nurbs plane, use something like this:
myObject = pm.selected()[0]
howManyFollicles = 8
for i in range(0,howMany):
    oFoll = create_follicle(myObject, i/(howManyFollicles-1.00), 0.5)
Thanks For Reading
Share in the comments if you have used follicles to solve your rigging or animation problems!
Comments (closed)
Chris Lesage: Hi Marco, Thanks. Some of the rivet plugins I’ve seen come with very nice features too. I’ve used hundreds of follicles in some rigs (for a long tentacled creature for example) and I’ve found that by bypassing the Hair System I don’t see any significant performance hit. And all of the extra attributes associated with hair can be deleted since they aren’t connected to anything. (except U and V.)
Marco Giordano: Well done sir! But If I can I never use follicles , follicles comes with a crazy loads of features from hair system which require extra computation , of course It all depends how many you need but 99% of the time I use custom rivets I wrote both for mesh and nurbs surface so I am sure It s only doing the task is supposed to. But again well done the script is really userfull for people that cannot rely on plugins
Chris Lesage: Thanks Brad! I had never noticed the Popup Menus option there! That is a nice way to quickly build up some flexible menus, without getting into designing a little UI or popup dialog.
Brad Clark: This is a great little script and a perfect tool to use this shelf #rigtip with. I took the code, added a double click to run the single follicles build and then added some right click options to add diffrent set of follicles to selected surface. https://vimeo.com/45485411 Thanks for the script Chris, Hope you are well.