How To Stop Collapsing Vertices in Maya Post Normalization
Posted on May 14, 2012 - category: character-rigging

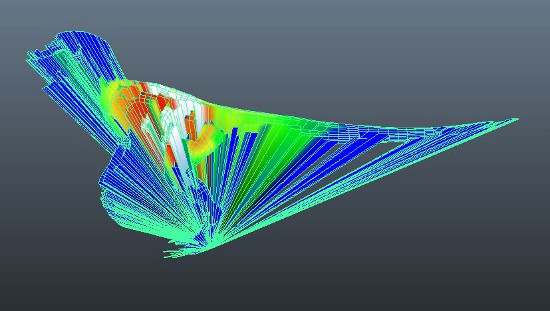
So this is annoying. You are trying to paint weights in Maya using Post Normalization and a bunch of your vertices are collapsing to the origin! What’s going on!?
Don’t fret. There is a simple explanation and an easy fix for this. But first, let’s look at what Post skinning is doing:
“What is this Post Normalization skinning all about?”
When using Post Normalization skinning for the first time, it can be a bit tricky to figure out how things are working. Basically Maya is taking the total of all the weights and then normalizing it to 1.0. With classic interactive skinning this is done while you paint, which means if you paint on Influence A, Maya automatically steals weights away from Influence B and Influence C.
If you are subtracting weights, it automatically tries to add weights to other joints. This can be very buggy and throw weights unpredictably.
With Post Normalization, Maya is keeping all the weights you’ve painted and doing this calculation on the fly. It stores the values of your weights without changing any of the others. You can paint all the way up to 1.0 on Influence A, Influence B and Influence C. Maya averages it out and the final effect is 0.333 on all 3 influences, but the weights are still painted to 1.0. This can be a great way to think of your weights as separate layers. It’s like a bunch of overlapping venn diagrams.
“So what is happening in that ugly image?”
What you are seeing is essentially a divide-by-zero error. When you first encounter these collapsing vertices, you might think it is a bug and dismiss Post Normalization as garbage or confusing. But it has a simple explanation. Since Maya isn’t automatically changing any weights, if you can paint all the weights to 1, you can also paint them all to 0. Maya is trying to calculate the totals of the weights but when there are no weights to divvy up, it simply can’t make the calculation.
How To Fix It
Luckily there is an easy fix. What I do is create an extra joint called “base_influence” and place it anywhere in the middle of my character or at origin. Next, flood the entire character geometry with 0.05 weight on “base_influence”.
Now you can paint the rest of your joints freely, but this one will always hold a tiny little bit of weight to prevent collapsing. Lastly, don’t forget to constrain this “base_influence” to your characters root joint or root controller so it follows when you move the character.
“Why use it if it is so confusing?”
It took me a while to get used to, but I use Post Normalization skinning all the time now. You get to think in layers. Smoothing and subtracting weights is bug-free. You just have to get used to the fact that if you are painting Influence A, you have to manually paint away any overlapping influence on Influence B, or you will never reach full influence.
Another Alternative
I haven’t had time to test this tool out yet. If you are interested in advanced skinning techniques and painting in layers, this sounds like a promising tool worth checking out: ngSkin Tools developed by Viktoras Makauskas. It sounds like Viktoras is developing something which solves a lot of the common frustrations with a Maya skinning workflow. It also uses regular skinning nodes, so it can also be a solution to video game riggers if Post Normalization isn’t an option for your engine.
If you have any skinning tricks and techniques, please let me know in the comments or share your wisdom on Twitter with the #rigtip hashtag.
Comments (closed)
Alex Bone: thank you so much, this is great advice